Aug 9, 2011
Jun 27, 2011


Apr 4, 2009
Fence building photos - July 2008
I built a backyard fence last summer, with a fair bit of help from my father-in-law and a guy who installed the posts (big job, that one, and totally worth the $500).
Knowing that a few people will be planning to build their own fence in a few months, I thought that I'd post a few photos and some info to be helpful.
But first, I have to point out the very cool playhouse that was given to us - and then moved into our back yard in two pieces - just one day before the fenceposts went in (a day later, and we wouldn't have been able to get the playhouse into the yard).
The quick version of how we got the playhouse? A neighbour down the street wanted to get rid of it. They asked another neighbour - who owns a sign business and a crane - to move it. The crane-owning neighbour knows we have kids and asked if we'd be interested in having a playhouse. Our answer was "yes!" and the photos below tell the rest of the story.
The playhouse (and my four-year-old daughter):

The crane that our neighbour used to drop it onto our lawn (the roof was separated from the base during the move - both were hauled down the street on a big trailer):

 And now for the fence. While I like to do as much of my own work as possible, I'm a realist. Setting the posts properly is the key to a good fence, so I hired that job out. What would have taken me days to finish took the pros just over an hour. The company I hired used three guys and a bobcat with a post-hole auger attachment. (See the ad to the right for contact info - it's not a paid ad, by the way.)
I supplied the posts, of course. All they required was that I stake out the post-hole locations and have MB Hydro mark out the gas lines and any underground electrical cable (not an issue in our neighbourhood). They did the rest. The total cost was just over $500 for about 25 posts.
Here's a photo I took before they came in and placed the posts:

Here's another one:

And now for some fence photos. I decided to go with a very simple design. Rails on the top and bottom, boards spaced with about a 1/4" of daylight in between each one. The posts were set on a Sunday. Building the rest of the fence took two days plus an hour or two for the gates.


To sum up: getting someone else to set the posts was important to me. You can do it yourself, but you'd have to rent a power auger, buy your own gravel, and spend a whole lot of time getting the posts plumb and level. Definitely not worth it in my case.
The rest of it was straightforward, including the gates. It made for a fun July long weekend.
Any questions, leave a comment.
Jan 17, 2009
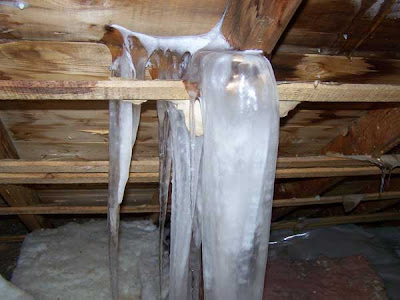
Ever wondered what condensation in the attic looks like?
Every winter, we've had issues with water leaking through the kitchen ceiling whenever the weather warms up.
I always thought it was ice-damming. Like many of the homeowners in our area, we've got huge ridges of ice along the bottom of the roof of our 1.5 storey. Given the thin (possibly non-existent) insulation in our roof, there's certainly the potential for leakage due to ice dams.
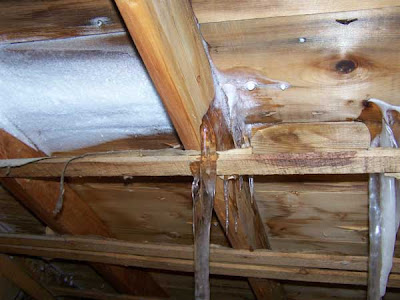
Last spring, however, a home inspector told me that attic condensation is the more likely culprit. My understanding of attic condensation is that it's caused by moist warm air leaking from the insulated area of the house, condensing on a cold surface in the uninsulated attic, and then freezing. When the outside temperature warms up, the ice and frost inside the attic melts and the water finds its way into the house.
Unfortunately, we didn't get to test his theory because it was spring already - too warm to check for the telltale signs of attic condensation.
Earlier this afternoon, I finally got around to doing some poking around. Below are a few photos of what I found. I'm pretty sure there's warm air leaking into the attic - we've got icicles in there that are bigger than Michael Clark Duncan's arms.

Apparently there are no easy solutions. My wife phoned several insulation contractors who said they don't do 1.5 storey houses because their design makes it difficult to eliminate problems like this.
This may be a job that I try to tackle on my own. I couldn't make it much worse . . .
Here's some pretty good information about ice-damming and attic condensation from CMHC.
I always thought it was ice-damming. Like many of the homeowners in our area, we've got huge ridges of ice along the bottom of the roof of our 1.5 storey. Given the thin (possibly non-existent) insulation in our roof, there's certainly the potential for leakage due to ice dams.
Last spring, however, a home inspector told me that attic condensation is the more likely culprit. My understanding of attic condensation is that it's caused by moist warm air leaking from the insulated area of the house, condensing on a cold surface in the uninsulated attic, and then freezing. When the outside temperature warms up, the ice and frost inside the attic melts and the water finds its way into the house.
Unfortunately, we didn't get to test his theory because it was spring already - too warm to check for the telltale signs of attic condensation.
Earlier this afternoon, I finally got around to doing some poking around. Below are a few photos of what I found. I'm pretty sure there's warm air leaking into the attic - we've got icicles in there that are bigger than Michael Clark Duncan's arms.


Apparently there are no easy solutions. My wife phoned several insulation contractors who said they don't do 1.5 storey houses because their design makes it difficult to eliminate problems like this.
This may be a job that I try to tackle on my own. I couldn't make it much worse . . .
Here's some pretty good information about ice-damming and attic condensation from CMHC.
Nov 11, 2008
Garage demolition - down the slippery slope
Background
Our house is an 1168 square-foot 1.5 story in lovely East Kildonan. We're on the west side of Henderson Highway - lots of trees, standard 50 x 100 lots, front drives (mostly), houses built in the 1940s (mostly), awesome neighbours (period).
The first summer we lived here, I spent a good couple of weeks ripping out the overgrown junipers in the back yard, netting us about 350 square feet of extra space. Plus an old soccer ball.
The second summer we tackled the garage. The original owner of our house was a small man who drove a small car. Naturally, he built himself a small garage.
As you can see from the picture below, an average-sized person had to duck considerably to get into the garage. Our van wouldn't fit inside, so it didn't make sense to keep the thing on the property.
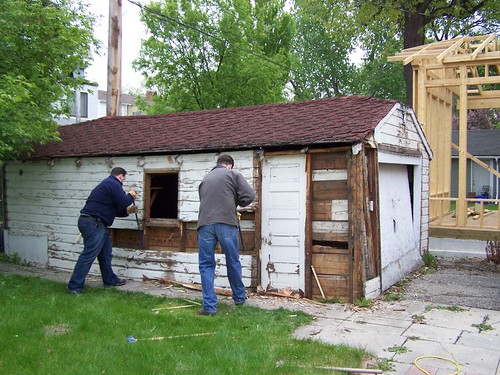
The demolition took a full Saturday. A friend and I did most of it, but my father-in-law helped for a couple of hours. This particular garage was built with 1X6 tongue and groove lumber, which required a fair bit of smashing and prying - plywood or OSB sheeting would've been a lot easier.
Dumpster
I rented a dumpster (also known as a roll-off container or a garbage bin, depending on which section of the Yellow Pages you're looking in) from Simpson's Transfer and Feed (phone number and address are here). The total cost of the rental was in the $350-$400 range, for a 20-foot container. Most of the cost came from drop-off/pick-up fees, fuel surcharges and dumping fees (based on load weight - so keep the concrete out of the bin!). Per-day charges were negligible, from what I remember.
I suggest shopping around - Simpson's Transfer and Feed were the cheapest I could find, and the service was fantastic, but you might find something better.
What foundation?
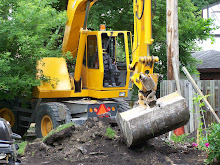
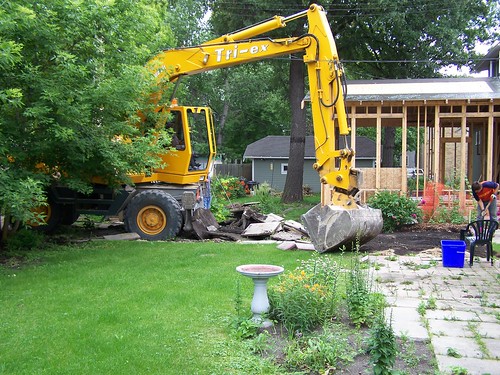
Once the garage was down and its musty-smelling skeleton was hauled away, all that was left was a thin asphalt pad. A number of back-breaking options were available at this point, but luckily for me (and my back), a neighbour down the street has a contracting business. He happened to be doing an excavation job not far from our house, so he was more than happy to have us split the cost of a backhoe and dumptruck with the other homeowners he was working for.
Normally, he said, these guys "don't leave the yard for less than $1000", meaning we wouldn't get a callback on our measly little job. As it was, we paid about $350 for a complete excavation - it took 45 minutes - and that was the end of the garage demolition.
Here's a shot of the backhoe:
Email me at ericfriesen67[at]gmail.com if you have any questions!
Our house is an 1168 square-foot 1.5 story in lovely East Kildonan. We're on the west side of Henderson Highway - lots of trees, standard 50 x 100 lots, front drives (mostly), houses built in the 1940s (mostly), awesome neighbours (period).
The first summer we lived here, I spent a good couple of weeks ripping out the overgrown junipers in the back yard, netting us about 350 square feet of extra space. Plus an old soccer ball.
The second summer we tackled the garage. The original owner of our house was a small man who drove a small car. Naturally, he built himself a small garage.
As you can see from the picture below, an average-sized person had to duck considerably to get into the garage. Our van wouldn't fit inside, so it didn't make sense to keep the thing on the property.
The demolition took a full Saturday. A friend and I did most of it, but my father-in-law helped for a couple of hours. This particular garage was built with 1X6 tongue and groove lumber, which required a fair bit of smashing and prying - plywood or OSB sheeting would've been a lot easier.
Dumpster
I rented a dumpster (also known as a roll-off container or a garbage bin, depending on which section of the Yellow Pages you're looking in) from Simpson's Transfer and Feed (phone number and address are here). The total cost of the rental was in the $350-$400 range, for a 20-foot container. Most of the cost came from drop-off/pick-up fees, fuel surcharges and dumping fees (based on load weight - so keep the concrete out of the bin!). Per-day charges were negligible, from what I remember.
I suggest shopping around - Simpson's Transfer and Feed were the cheapest I could find, and the service was fantastic, but you might find something better.
What foundation?
Once the garage was down and its musty-smelling skeleton was hauled away, all that was left was a thin asphalt pad. A number of back-breaking options were available at this point, but luckily for me (and my back), a neighbour down the street has a contracting business. He happened to be doing an excavation job not far from our house, so he was more than happy to have us split the cost of a backhoe and dumptruck with the other homeowners he was working for.
Normally, he said, these guys "don't leave the yard for less than $1000", meaning we wouldn't get a callback on our measly little job. As it was, we paid about $350 for a complete excavation - it took 45 minutes - and that was the end of the garage demolition.
Here's a shot of the backhoe:
Email me at ericfriesen67[at]gmail.com if you have any questions!
Subscribe to:
Posts (Atom)